Pages

Thursday, September 25, 2014

Eggyolk Biscuit♥蛋黃小餅乾

Cute嗎?我覺得很cute 喔。。heheh... 自己贊自己的作品 ^__^

這其實是昨天弄的,弄完"Eggwhite Soya Cake 蛋白豆漿蛋糕" 之后,不捨得把蛋黃丟掉啊,所以就弄了這些小可愛。它們雖然只是圓圓的,簡簡單單,沒什麼造型或裝飾,但有時候有些東西,勝在夠簡單平凡,就可以討人歡心。就像我們做女人,都是一樣的,贊同嗎?(",)

♬°°°°°°♬°°°°°°♬°°°°°°♬°°°°°°♬°°°°°°♬

Ingredients:

~ butter 90g 牛油 (do choose a good brand) 

~ icing sugar 60g 糖粉

~ eggyolk x 3 蛋黃

~ super fined flour 100g 特幻粉

~ corn starch 120g 玉蜀黍淀粉


Method:

1) mix well butter with icing sugar, you may use double boiling method to melt the butter. 把牛油+糖粉混合一起,要先溶化牛油,或室溫

2) mix in eggyolk one by one, mix well before adding in each of the eggyolk. 加入蛋黃,一粒加入后攪拌好,再加入另一粒

3) sift in flour and corn starch together 篩進粉類

☞Now you may preheat oven at 160° 現在妳可以預熱烘爐 160度☜

4) knead the mixture become a dough 搓揉混合物成面團

5) pinch out some dough to roll into a ball. I have rolled out different sizes of round biscuit balls :) 掐出少少面團,滾成圓球形,我是弄了不同大小的圓餅球 :) 

6) bake for 15-20minutes 烘15-20分鐘

≈≈≈≈≈≈≈≈≈≈≈≈≈≈≈≈≈≈≈≈≈≈≈≈≈≈≈≈≈≈≈≈≈≈≈

The dough 面團


Ready 搓好囉


Almost mess up everything while i turn my tray 在中途轉烤盤時差點倒掉


好吃嗎?
當然好吃囉 ^______^

Wednesday, September 24, 2014

Eggwhite Soya Cake 蛋白豆漿蛋糕

很好吃,真的很好吃♥

這蛋糕不用牛油,不用芝士,連雞蛋也只用了蛋白,讓人感覺很健康。單看整個蛋糕,就讓我覺得不捨得一刀切下,因為它是那麼的雪白 (雖然我有灑上可可粉來點綴).

吃進口,感覺綿綿的,就像吃着帶有豆漿味的cheesecake, 很喜歡 ^_____^

食譜用英文,方便大家 (",)

Ingredients:
❉ eggwhite 蛋白 x 3
❉ castor sugar 幻糖 40g
❉ soya 豆漿 60g
❉ corn oil 玉蜀黍油 35g
❉ super fined flour 特幻粉 50g
❉ corn starch 玉蜀黍淀粉 10g

Method:
*preheat oven at 160° 預熱烘爐160度*
1) mix well corn oil and soya, sift in flour n corn starch 把豆漿和玉蜀黍油攪拌勻均,然後篩進粉類

2)  beat eggwhite in a clean bowl, add in sugar in 3 batches, and continue beating until it reaches stiff peak 用乾淨無水滴的盆打蛋白,發泡后加入幻糖 (分3次), 然後把蛋白打至硬性發泡

3) fold in beaten eggwhite to soya mixture, by using a spatula, in 3 batches. 分3次把蛋白拌入豆漿混合物,用切拌式喔 (不能亂攪拌) 

4) bake for 20minutes 烘20分鐘

※i sprinkled some cocoa powder during the last 5 minutes baking 我在最后5分鐘才把蛋糕拿出灑上可可粉※

♥♥♥♥♥♥


The soya mixture


The egg white at stiff peak


兩個寶寶連續吃了兩片,老公吃了一片,說如果這蛋糕冷凍了應該會更好吃,然後就把其余的蛋糕送進冰箱了 (∩_∩)

Friday, September 19, 2014

Mango Yogurt Cake 芒果優格蛋糕

This is a very simple recipe, which require no butter (no need to wait for the butter melt or trouble of double boiling), no egg yolk and white separation (which always make me feel so stressed).

Its actually a 2egg recipe, but i added 1 more egg, simply because i do not have smaller mould (6"), and i just simply add a bit more of other ingredients as well.

Final outcome for my 7" square mould?
Luckily not so short, still ok la ^_^


Ingredients:
✺ 3 eggs
✺ 100ml mango yogurt 
✺ 130g sugar 
♧ 135g flour
♧ 1.5 tsp baking powder
♧ 2tsp grated lemon skin
❀ 100ml corn oil

Method:
Preheat oven 170°
1) mix all ✺ well
2) sift flour and baking powder
3) mix in all ♧together 
4) mix in ❀
5) mix everything gently by using spatula/hand
6) bake for 40minutes or until the skewer comes out clean


Since i baked this late night, i didn't really try much of it, but hubby and bb megan grabbed few slices happily. The cake is extra moist this morning, but i personally think it would be best if i added in some real mango dice, next time...... maybe :) 

Saturday, September 13, 2014

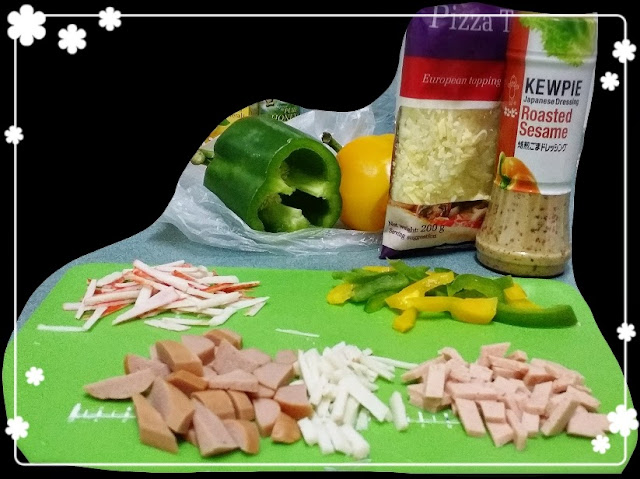
比薩比薩 Pizza Pizza


第一次做比薩,不難啦,因為我買了現成的 cheese pita, 只需要放上自己喜歡的topping/料,就ok囉。。。

Spread some tomato sauce before topping

Preheat oven at170°, and bake for 15minutes 

芝士蛋麵包 Cheesy Egg Bread

今天的早餐,簡單,好味 ♥
我已經把步驟放進照片裡,超容易的哦 ^_^
Ingredients:
♧bread, as many as you like
♧cheese slice, depends on how many you wanto make
♧egg 1-2
♧some butter

Saturday, September 6, 2014

上海月餅 Shanghai MÖÖncake

上海月餅,哈,收了食譜一段日子,再過兩天就是中秋節,而且今晚中妹要在她新家搞個中秋聚會,所以,我終於在昨夜動手做了。
本來很想弄千層酥,超想弄的,但我沒有買芋頭,買了也會很懶惰弄熟,也有想到裡面可以放白蓮蓉啊,或是紅豆沙之類的,但昨夜啊,我竟然忙到。。。半夜1點多才開始動手!那時的我真的很累,有點想不做哩,因為隔天要8點起身啊。結果,弄到半夜3點多才能上床睡覺,眼睛蓋上了,卻用了很久的時間才真正入睡zzzzzz...


Ingredients:
❀75g 面粉 plain flour
❀25g 糖粉 icing sugar 
❀12g 奶粉 milk powder (i used soya powder) 
❀6g 蛋黄粉 custard powder (i used corn flour) 
❀1/4tsp 发粉 baking powder
❀25g 白油 shortening 
❀12g 菜油 vegetable oil (i used corn oil) 
❀1/2粒 鸡蛋 egg

白莲蓉&紅豆沙馅料 (搓圆,各30g)white lotus & redbean for filling (shape round, 30g each)


Method
1)把所有粉類,混合均匀。Mix all powder and flour
2)再把白油,菜油及鸡蛋依序加入面粉里混匀。Follow by shortening, vegetable oil, and egg.


3)把面团分成8份小面团 (30g), 再把馅料 (30g) 包入,搓圆,排放在烤盘上。Separate into 8 portion (30g each),  and wrap in the filling (also 30g each). Roll into a ball, put on a baking tray.


4)掃上蛋液,再以黑芝麻做装饰。Spread some egg yolk on each mooncake, and sprinkle some black sesame on top. 


5)烘爐预热后,以180度烘约20分钟或呈金黄色即可。Bake in a preheated oven at 180° for 20minutes, or until golden color. 


♥♥♥♥♥♥♥♥♥♥


Tuesday, September 2, 2014

Egg-cellent Breakfast

Yes, this is simply an ✺Egg-cellent Breakfast✺ that everyone loves, and a big hit when its served right out from my oven.

Easy, healthy, full of satisfaction. It is so simple as all ingredients are those that should be available always in your fridge (if you cook/bake).


Ingredients:
✺ loaf of bread
✺ tomato (slice it)
✺ ham (i used chicken ham)
✺ grated cheddar cheese (may use other cheese)
✺ 2 - 3 eggs (if small portion. 1 egg is enough)
✺ some fresh milk

Method:
1) cut bread slice to 4, depends also how big your pan to hold the bread
2) spread some butter on all bread slices (both sided)
3) arrange the bread slices on a pan, use the one to make pie, easier. Photo below was downloaded as i forgot to take photo of this first step)


4) arrange the slices of tomato in between the bread slices

5)  put in ham slices

6) beat the eggs + milk, and pour onto the slices
7)  sprinkle grated cheese on top of the bread

8) bake in preheated oven at 180°, until the cheese are melted

ENJOY ❣❣